Sunday, April 29, 2012

Busy Week Planned

If you read my blog, you will be aware I like making little gifts.  Well, on Friday I was asked if I would like to have a table at a Farmers market, in a neighbouring town next Sunday to sell my handmade items.  Normally the only table I have are trade tables at Quilt Exhibitions, which showcases the products in my online store.

After careful consideration, I decided to say "YES".  Then Friday evening when I was checking what I had available to sell, there was no where near enough to fill a table, or even enough to make it look presentable.

Yesterday, Saturday I stayed on my sewing machine most of the day.  I make 20 x emery board covers, 20 x card holder key rings, 12 x tissue covers and some scrappy key rings.  So this will build the stock up a little bit.

The scrappy key-rings were made using some fabric scrap booking tags, and I quite like how they turned out.  The khaki adventure one, was the first one I made which was too big, and "too" scrappy.  The smaller size is ideal.


I needed to package up the ribbon bookmarks that I made awhile ago.  I just used card stock and glued some book pages to the front.  I then used a paper-clip to hold the bookmark onto the card stock.  What do you think?  Does it need something else? 


This week, I will be making some signs and labels for all the little gifts.  I have some Rice Heating Bags to fill and some little Owls to make.  Hopefully people will think they are a great idea for Mothers Day, and purchase some of my handmade gifts.

Lastly a BIG Congratulations to my niece Kate on her engagement to Matt yesterday.. Best wishes from all the family.


Judy
Thursday, April 26, 2012

Procrastination

Do you know someone, that always procrastinates when a particular task needs to be done?  I am that person, especially when it is time to do the ironing!  I do not know why I find it such a chore, but I leave it until it can no longer be left!  It takes me twice as long as it should, as I always find something to "side-track" me, which is the reason for this post.

Plain old wire coat-hangers, so boring...


Take 30  minutes out of your ironing time, and you can have these


Nothing fancy, or hard.  Just cut strips of fabric into any size (mine were approx 1.5") and wrap around your coat-hanger.  I started near the hook, up around the hook, and then around the entire hanger.  When I got back to the starting point, I cut the fabric up the centre, wrapped it around the base of the hook to make a little bow.

OK - back to the ironing.
Judy

Wednesday, April 25, 2012

A Day to Remember

Every year on this day, April 25th, we show our gratitude for the men and women who fought to keep Australia a free country by commemorating our Anzac's.  Most of us are related to, or know someone who served in a World War or who are even now, serving in the Australian armed forces.

It is the day to publicly show our respect, by attending the many dawn services and Anzac Day marches.  In my home town, it is a very moving ceremony, and although the weather is usually terrible, I will certainly be there to say "THANK YOU".

My mother was in the "Australian Women's Land Army", during the war.

Join the Women's Land Army, 1943, courtesy of Australian War Memorial


"The aim of the AWLA was to replace the male farm workers who had either enlisted in the armed services or were working in other essential war work such as munitions. The AWLA was not an enlisted service, but rather a voluntary group whose members were paid by the farmer, rather than the government or military forces. Membership of the AWLA was open to women who were British subjects and between the ages of 18 and 50 years. Housed in hostels in farming areas, members were given formal farming instruction and were initially supplied with uniform, bedding etc. Members were not engaged in domestic work rather they undertook most types of work involved with primary industries "


On the 24th April, 1995 my mother was awarded The Civilian Service Medal 1939-1945 which recognises the service of eligible civilians in Australia during World War II.

This medal is for civilians who served in arduous circumstances in support of the war effort as part of organisations with military-like arrangements and conditions of service. The Civilian Service Medal was created in 1994 after many years of campaigning for recognition of the Australian Women's Land Army's service to the nation.


Can you tell I am very proud? 

Take the time today, to talk to and show your appreciation to our diggers. We should all be thankful

Judy

Sunday, April 22, 2012

Vintage Matchbook Needle Keeper

In my last post I used Vintage Labels from Just Something I Made as the backing sheet for my Needle Nanny. I then found that I had downloaded her Free Digital Download of Vintage Matchbook Covers some time ago.


So, with the little sewing gifts idea still in my mind, I printed these images onto card stock, cut them out and made them into Matchbook Needle Keepers.


Just score on the fold lines, cut a piece of felt to fit inside and then staple the felt inside the matchbook


Then to finish, add your needles, close your matchbook and you have a nice safe way to store your needles.


Quick and easy and inexpensive. 

Till next time
Judy

Saturday, April 21, 2012

Needle Nanny

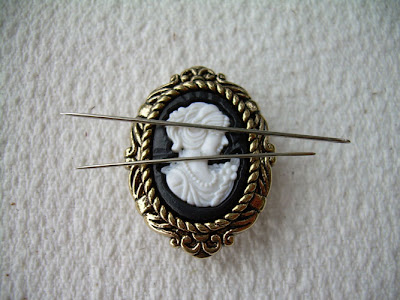
Now I must admit I had not heard about a Needle Nanny until I found a new blogging friend.  Cath from Bits 'n Bobs came for a visit, and when I returned the visit to her blog I found this My Needle Nanny.  Her Wedgwood look alike's were absolutely gorgeous.  Well I did not have anything like that, although I did have a packet of Victorian buttons in store which had a lovely cameo in it..


So off I went to make my own Needle Nanny - supplies needed:


Just cut the backs off the buttons using the shank remover


Place your magnets behind the buttons and check that you have the right side facing the button to ensure that your needle and pins will stick to it - just place a couple of needles on them to be sure before you glue on the magnet on

Glue your magnet on the back, using a strong glue


Allow to dry, and then turn your button over and admire your new Needle Nanny


Test to ensure that your needles stick to the magnetised button


Oh yeah, very cute


Now, I do not need more than one Needle Nanny, so I printed out some Vintage Labels designed by Cathe Holden from Just Something I Made and using double sided tape, stuck the Needle Nanny on these labels.  The ones below are made with the new plastic sewing machine buttons just added to my online store, which I thought was appropriate.


The little label I have put on the bottom, reads "Your needles and pins will never go astray, if you have your Needle Nanny handy".

All packed up in cellophane, ready for either gifting or sales


What do you think?  Are you going to make some Needle Nannies?  These would be a great gift for your sewing group members.

Now, what next on my list of things to try ....hmmmmm

Judy

NB:  If you purchase a packet of Nostalgic Treasures (or any other button pack) from my online store to make your Needle Nanny's I will include 6 little magnets  .. just put a comment on your order so I will know.

Saturday, April 14, 2012

Magnetic Bookmarks

One of the many I blogs I follow is Sew Many Ways.  A couple of weeks ago they had a little tutorial on making magnetic bookmarks using scrap fabric.  This combined the two items that I am currently playing with in my craft making.  Bookmarks and Fabric.. is cannot get much better than that!

The tutorial used a magnetic business card, as I did not one of those available, I just used a old fridge magnet.  Find the centre and cut it into 2 even pieces.


Follow the instructions on Sew Many Ways Blog to complete your bookmarks.  Just ensure you have the magnets inserted the right way so that they attract each other


Folded over with the magnets attracting each other


Inserted into a book - you can shake the book and they will not fall out.  The magnet is not very strong, but certainly strong enough to stay in the book


Can you see it in the book below?


This is the fabulous book I am browsing through at the moment to get some Victorian ideas.  The graphics and information about the Victorian era is fascinating.


What you end up with, fabulous magnetic bookmarks that do not cost anything at all to make.


If I am missing in action for a little while, do not worry.  I have a number of boxes of products to upload to my online store.  Pricing, Photographing, Documenting, and then putting them all away.  The buttons are first on my list this weekend.


Have a good weekend
Judy

Sunday, April 08, 2012

Easter Bunny Pops

These gorgeous bunny pops were finished just in time for Easter giving.


Based on instructions (with a little twigging) from The Mother Huddle these bunny pops were very easy to put together,  and they are super cute.  I had everything on hand, with the exception of the pops, but a quick trip to the supermarket, netted me a bag of Chupa Chups.  I imagine they are smaller than what is available in the States, but they worked out fine.  I used a small polystyrene ball for the head.  It was very easy to thread the stick of the lollipop through the polystyrene.  It also made it much easier to insert the pipe cleaner ears.

Googley eyes, different sized pom poms, and he is finished.  He even has a little tail on the back.


These little bunny pops are making there way to my nieces and nephews in Tumut, I also made up some kits for them to try and make their own.  Great for the school holidays.


All eight Chupa Chups completed ...


According to Wikipedia, A group of rabbits is known as a colony or a nest.  I think my "colony" is very cute

I hope you all enjoyed your Easter holiday with family and friends

Judy

Friday, April 06, 2012

Cutlery Holders

A family tradition of ours is to gather at my Mums house for Seafood lunch on Good Friday.  Even though her house is in upheaval as we wait to get repairs done after the recent flooding, she still wanted it to be held.  Most of the cupboards are empty, nearly all crockery and cutlery boxed away, so we decided on a "picnic" style luncheon.

I decided to make some cutlery holders using old Readers Digest book pages.


For strength and stability, I used six pages in total, 3 for each side.  I used scrap booking scissors to cut a decorative edge on the top, which was then folded down approx 1".  Front and back placed together and then sewn with a zigzag stitch down both sides and across the bottom.

I have placed a paper napkin and then the cutlery in each holder.  It looked a little bare, so for the Easter season, I placed a small chick sticker on the bottom corner.  Just enough!

Maybe next time, I may use coloured cotton?


For ease of access, all the new paper holders were placed in a pencil holder, which I tied with a Easter ribbon. 


I love how the ribbon picks up the colours in my garden in this photo.  A simple way to present your cutlery at a informal function.

Just another close-up photo


On another note, I have only just taken the plunge and converted to the new Blogger interface, so fingers crossed there will not be any mysterious changes to my blog.  It is very different in the back end, where I create these posts, but hopefully I will be able to sort my way through.

Tomorrow I am going into town to our Leeton SunRice Festival Parade.  I love parades.

Our Leeton SunRice Festival is held biennially at Easter in conjunction with the rice harvest and celebrates the importance of the rice industry to the Leeton community.

Have a great Easter with family and friends. 

Judy

Monday, April 02, 2012

Eye Pillows


The satin pillowcase and net curtain were recycled into refreshing, relaxing lavender eye pillows with a removable cover.

I used the rice bag instructions from Selina Quilts as the base for these eye pillows.

The inner bag (net curtain) was cut 4" x 16" and sewn into a bag.  The outer cover was cut 4.5" x 18".


The inner  bag was filled with a combination of lavender and buckwheat - ratio of 1 part lavender to 2 parts buckwheat.  I could not purchase any flax seed or linseed locally, so went with the buckwheat.


The net curtain allows the aroma to come through, but not the actual ingredients. The inner bag is then popped into the removable outer bag.  The first one, I used Selina's instructions and had the opening of the outer bag towards the top.


I then changed the opening to be more in the middle, this allowed the lavender bag to be inserted and removed more easily.

I folded one end in 5" and then folded the other end in 4", overlapping the 5" section slightly.  Pin and sew down the sides.  As simple as that!  There is not much difference, but is does make it easier.

Showing the back -


Now the front -


As these will be used on your eyes, I did not want to embellish the actual pillows, so I thought a little glamour could be in the packaging.

Using card stock, I made pillow boxes for the lavender eye pillows.  No real pattern used, just 8" in length, 4" wide and using a dessert bowl to create the ovals on the side to close the box. 

The lavender eye pillow slides easily into the box


Just push the ends in to close the box


Embellish as desired, with ribbons, lace, buttons etc


A pretty and practical gift using recycled materials.  Unfortunately I did not get started on the vintage doilies, as household chores (ironing, yuk) needed to be completed.

Until next time, happy crafting
Judy